I blended two images together to create this picture. I picked two images and made sure they were the same size. I chose the picture with the piano as my target image. That means it's the background images, the main one. I made a duplicate layer of the background layer. I then went to image and apply. Once the picture had been applied to the other picture with the piano I changed the opacity. I made the opacity around 70%. The difference between this picture and the other blended image was that I used a gradient map on the flower image before blending it with the piano. I chose an orange gradient and made it darken across the flower.
 In the beginning, I used the magnetic lasso tool to copy and paste my dog on a new layer. I did the threshold process on the picture of just my dog. I made a duplicate background layer and made ten layers of it. I used threshold on each layer and started with the top layer showing only a little black and ending with the bottom layer, which was completely black. Starting on the top layer and working my way down, I used the magic wand tool to delete all the white in the picture. After deleting the white on that layer, I made sure all the pixels were highlighted and I would pick the color I wanted the black to become and clicked control and backspace at the same time. I did this for each layer working my way down to the bottom layer; the only difference for each layer was the color I chose. The top layer has the darkest color and the bottom layer has lightest color. Also, I made the duplicate background layer black and white and put a filter on it. I used the glass filter I think. I changed the settings of it until I was happy with it.
 The way I created this picture was by copying Alex and pasting her onto the other picture. First, I made a duplicate layer of the background layer. Second, I desaturated the image of the road and I put a artistic filter on it. I believe it is the colored pencils one, but I changed the amount of lines and darkness until I liked it. Third, I used the magnetic lasso tool to select Alex. Then I copied and pasted her onto the other image to get this picture.
 I used a fisheye effect on this picture. I took a picture of flowers and then made a duplicate of the background layer. I used the elleptical marquee tool to select a part of the picture. If you hold down the shift key you can get a perfect circle. Once I have the circle around the portion I want, I go to select inverse and then hit delete. Now the image is just in the fisheye lens. I reverse my selection, so that the whole selection back in the fisheye lens. I crop the picture so it's only of the fisheye lens. I go to the filters and select the spherize filter under distort. I can change how much I want to distort it, and after I click ok the picture looks like it was taken with a fisheye lens.

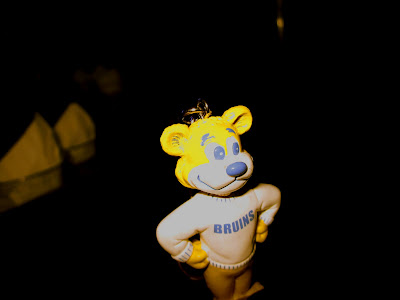
Our assignment was to create a picture using the skills we learned using Photoshop. In the beginning, I used the magnetic lasso tool to copy and paste my keychain on a new layer. I did the threshold process on the picture of just my keychain. I made a duplicate background layer and made ten layers of it. I used threshold on each layer and started with the top layer showing only a little black and ending with the bottom layer, which was completely black. Starting on the top layer and working my way down, I used the magic wand tool to delete all the white in the picture. After deleting the white on that layer, I made sure all the pixels were highlighted and I would pick the color I wanted the black to become and clicked control and backspace at the same time. I did this for each layer working my way down to the bottom layer; the only difference for each layer was the color I chose. The top layer has the darkest color and the bottom layer has lightest color.
After the threshold, I decided I wanted to use one of my landscape photos as the background for my keychain threshold picture. I had to check the image sizes for both picture and make sure they matched before I could combine the pictures. I made the keychain photo the same size as the landscape photo. After that I used the marquee selection tool to select the whole landscape picture. I copied the selection and pasted it onto the keychain photo. I put the landscape layer underneath all the other threshold layers, and this made it look like the background of the keychain picture.
I wanted the landscape picture to look different, so I used a gradient map on the landscape picture layer. I chose a gradient that had pink in it. I put that on the picture of the landscape. After that I chose an artistic filter for the landscape layer too. I picked the neon filter. Lastly, I selected a photo filter to put on the landscape picture, even thought it had the gradient map. The cooling filter 82 is the filter I picked. This is why the background has pink and blue in it.